Always with you
The most recent chapter stopped me in my tracks. This was another life-changing chapter for me. Let’s discuss “Right before our eyes” of The Creative Act by Rick Rubin.
Artists occasionally experience a sense of stagnation. A block. This isn’t because the flow of creativity has stopped. It can’t. This generative energy is ceaseless. It may just be that we are choosing not to engage with it.
Rick is talking about feeling creatively stopped up. But living itself is a creative act.
These past 6 months have been incredibly difficult personally. I lost two significant sources of stability, that I thought would always be there. I want to tell you how this chapter helped feel stable in my freshly-shaken world.When my sources of stability were shaken up, I lost access to the creative energy of the universe. And that was incredibly scary. And incredibly painful. And incredibly sad. I learned that this was only how I felt - my perception, not what was actually happening. The creative energy of the universe is always with me.
This chapter helped me I discover once again, what many people already know: we each have own own connection to ceaseless creative energy. Here, I can give some examples. Priests can help my connection to creativity, but I don’t need them, I have my own. Drugs can help my connection to creativity, but I don’t need them, I have my own connection. Asceticism can help my connection to creativity, but I don’t need it, I have my own connection.
The universe can feel so uncaring and cold sometimes. But look around us. Look at all the movement around us. Look at all the accomplishments around us. Look how old we’ve all gotten. We made it this far. Look how tall the tree across the street has grown. Look how it’s leaves have sprouted.
I saw creative movement happening outside of me. As a computer programmer, I’m used to being mostly-responsible for everything that shows up on the screen. It’s there because of choices I made and work that I did. However, there’s so much creative energy in the world. Things are happening that I can’t see. Things are happening that I can’t do. This is a comforting thought to lean into.
What if the source of creativity is always there, knocking patiently on the doors of our perception, waiting for us to unbolt the locks?
The sun still shines behind the clouds. I invite you to find a new way to tune in to your direct connection to the creative energy of the universe.
February 2024 updates!
Hello and welcome to the second issue of the Full Queue Developer newsletter! In this issue, stream updates, app updates, and more!
Stream updates!
We maintained our live-coding stream on Sundays, and experimented with two new ideas!
Movie night!
We had our first ever movie night on stream!. We watched the first half of DDLJ, which is when the stream fell over.
Community night!
Thank you so much to everyone who came out for our first ever community night! It was so nice talking to you face-to-face.
Edges of Manhattan
Here’s a list of the new videos added in February for the workday streams. Looking back at some of my earlier videos, I see improvement! I also notice that I really value the gentle flow of water, as that’s been the main theme in all my videos, except the very first one.
- East River, Brooklyn Bridge, sunny, from FiDi.
- Hudson River, sunny, looking north George washington bridge
- Hudson River, sunset, looking south.
- Hudson River, WTC, The Whitney, and the Statue of Liberty
- Verrazzano-Narrows bridge at sunset, with a ship passing under it
- Verrazzano-Narrows bridge, water closeup!
- Statue of Liberty, as seen from Pier 25
YouTube updates!
We are up to 250 subscribers, and pretty much every recent video has at least one like! This is really motivating, and I’m so grateful to everyone who appreciates what I’m developing.
Underway updates!
We released one updated subway map, published by the MTA. And we launched Underway Friend, a new tier, between Pro and Ad-free, so that more folks can access some of our most popular features in Pro. We also crossed 300 followers on TikTok!
More on the way!
There’s more that I want to tell you about that hasn’t been published yet. I’m so excited, stay tuned!
Thank you!
Thank you so much for reading and staying up-to-date on what I’m doing. I have so much to share, and I’m so happy to share it all with you.
Thank you to my current non-gifted Twitch subs: lushvino, spjpgrd, franzserdarliszt, bitspectre, therandyconstruct, codedeliberately, wegorzx, & bruceleif. Thank you to my current GitHub sponsors: 0xLeif. And thank you to our very first Discord server subscriber: Squirtle.
January 2024 Recap
Hello and welcome to the first issue of the Full Queue Developer newsletter! In this issue, app updates, stream updates, and other updates.
App updates
Underway and Haptics Studio both received updates in January.
Underway
We released one updated subway map, published by the MTA and started work on a new tier, between Pro and Ad-free
Haptics Studio
Version 1.1.0 is live on the App Store, peaked at number 5 on the Developer Tools chart! This update adds free iCloud sync. Now your settings for haptics will sync to your other iCloud-enabled devices. This sync is powered by App State, a new open-source Swift Package that simplifies the management of application state in a thread-safe, type-safe, and SwiftUI-friendly way. Learn more on GitHub! https://github.com/0xLeif/AppState
Stream updates
We continued our work day streams, 10 am to 4pm. We also had a few bonus streams, focused around the following collabs:
AppState
We explored AppState on stream, and got iCloud sync working in Haptics Studio in less than 2 hours! A huge thanks to Twitch sub BruceLeif who sponsored this stream to gather feedback for AppState and spread the word on the new framework. Get in touch if you would like to sponsor some content, and of course check out App State! It literally left me speechless. https://youtu.be/l0gd_EFpqgA
Swift Developer Podcast
We appeared on the Swift Developer Podcast! Here is the live recording with Twitch chat going wild https://youtu.be/TxQ2-2tZpHY and of course Peter’s edited version https://share.transistor.fm/s/56ebce29
Work-with-me streams
These workday streams have been so fun! It’s so good seeing you all everyday! January saw the addition of 3 new videos to the lineup: Central Park walking in the snow through Seneca Village, West Harlem Piers on a very very windy day, and walking down the Hudson. Over the end-of-year break I also went back and color corrected many of the videos.
Other updates
A few other things I would like to tell you about that don’t exactly fit into the other categories.
Living the Creative Act update
We started Season 5 strong, with pre-edited videos! A few segments stitched together for about 20 minutes of discussion on the chapter of the day. I’m so proud of the work I did, and I amazed my self at what I could do. With this approach, I was able to go further emotionally with the piece, knowing that if I go too far, I don’t have to publish it. All-in-all, it was too much effort, compared to my other responsibilities. And Living the Creative Act has returned to its original form: casually reading the chapter and responding to it live on stream. The Living the Creative Act segments are still published to Apple Podcasts https://podcasts.apple.com/us/podcast/living-the-creative-act/id1710679124
2023 Recap
2023 Recap. 2023 was a huge year for me personally and for my projects. I made a video looking back on it! https://youtu.be/lLmR2xsx_vY
Thank you!
Thank you so much for reading and staying up-to-date on what I’m doing. I have so much to share, and I’m so happy to share it all with you.
Thank you to my current non-gifted Twitch subs: bitspectre, bruceleif, wegorzx, lushvino, kinkxz, franzserdarliszt, imulman, & therandyconstruct. And thank you to my current GitHub sponsors: 0xLeif
Ready for an open-source keyboard? Try the Unicorne
For folks that want the benefits of open-source keyboard, and also want to ‘just buy something that works’, the new Unicorne from BoardSource is what you’re looking for. And I’m gonna tell you why.
No soldering needed. Such a big deal that there’s no soldering needed on their PCBs. This design clears the way for more folks to get into open-source keyboards. If you wanted to put together a keyboard, you needed to pay someone to solder, or solder it yourself. The PCBs come pre-printed with hot-swap sockets, which means you can upgrade your key switches and key caps later, or swap out a broken one.
Easily removable legs for angling the keyboard. Screw them on, screw them off. Previously, I found some roomba bumpers on Amazon, that I’m using for tenting. Since they’re basically permanent, packing my keyboard for traveling is certainly awkward. Easily removable legs will Would love to see BoardSource offer different heights for these legs.
Aluminum case. Many other open-source keyboard store fronts rely on 3D printing, which is fantastic for flexibility. But for something I use all day every day, I really like BoardSource’s aluminum cases. The Unicorne does not come in their prettiest color: the anodized purple.
I’m not sponsored by BoardSource, just excited about their craftsmanship around open-source keyboards. I’ve previously purchased two Corne LPs from BoardSource, and wrote about it on my website.
Buy the Unicorne LP low profile keycaps from BoardSource https://new.boardsource.xyz/products/unicorne-LP
A real-life example of StaticMemberIterable
Now that Swift 5.9 is out, version 1.0.0 of StaticMemberIterable has been tagged! And here’s an example from some code I’m working on today.
A little background. I have three infrastructure-as-code directories, and I’m running Terraform through SPX to take advantage of op run to render secrets to my scripts.
If Swift Argument Parser supported short names for commands, this wouldn’t be necessary. Regardless, here we are, with a real-life use of StaticMemberIterable.
First, with an enum
I first modeled my three terraform directories with an enum, since I prefer using first-party tools when possible. It implements Swift Argument Parser’s ExpressibleByArgument so that it can be parsed from text on the command line.
enum TerraformDir_EnumStyle: String, ExpressibleByArgument, CaseIterable {
  case cloudflare
  case digitalocean
  case kubernetes

  var defaultValueDescription: String {
    "\(self.rawValue.yellow) or \(self.short.yellow) for short"
  }

  var short: String {
    switch self {
    case .cloudflare: "cf"
    case .digitalocean: "do"
    case .kubernetes: "k8s"
    }
  }

  init?(rawValue: String) {
    guard let found = Self.allCases.first(where: {
      $0.rawValue == rawValue || $0.short == rawValue
    }) else {
      return nil
    }

    self = found
  }
}
Second, with StaticMemberIterable
The implementation of var short: String really bugged me. The short name should be close to the raw-value name of the enum. I couldn’t override the raw value though, since the long name is the actual name of the directory (and also a valid value). Then I remembered I wrote something to help with this, StaticMemberIterable. I think this reads much nicer than the enum, since the long name and short name are right next to each other.
@StaticMemberIterable
struct TerraformDir: ExpressibleByArgument {
  static let cloudflare = Self(name: "cloudflare", shortName: "cf")
  static let digitalocean = Self(name: "digitalocean", shortName: "do")
  static let kubernetes = Self(name: "kubernetes", shortName: "k8s")

  let name: String
  let shortName: String

  init(name: String, shortName: String) {
    self.name = name
    self.shortName = shortName
  }

  var defaultValueDescription: String {
    "\(self.name.yellow) or \(self.shortName.yellow) for short"
  }

  init?(argument: String) {
    let maybe = Self.allStaticMembers
        .first { $0.name == argument || $0.shortName == argument }

    guard let found = maybe else {
      return nil
    }

    self = found
  }
}
Finally, the full example
Here’s the full example for context. It’s less than 100 lines.
import ArgumentParser
import Foundation
import Rainbow
import Sh
import StaticMemberIterable

@main
struct Terraform: ParsableCommand {

  @Argument(help: "Which terraform dir to run. Options are \(TerraformDir.allStaticMembers.map({ $0.defaultValueDescription }).joined(separator: ", "))")
  var dir: TerraformDir

  @Argument(parsing: .allUnrecognized, help: "Arguments passed along to terraform")
  var terraformArguments: [String] = []

  mutating func run() throws {
    try sh(.terminal,
           "op run --env-file op.env -- terraform \(terraformArguments.joined(separator: " "))",
           workingDirectory: dir.name
    )
  }
}

@StaticMemberIterable
struct TerraformDir: ExpressibleByArgument {
  static let cloudflare = Self(name: "cloudflare", shortName: "cf")
  static let digitalocean = Self(name: "digitalocean", shortName: "do")
  static let kubernetes = Self(name: "kubernetes", shortName: "k8s")

  let name: String
  let shortName: String

  init(name: String, shortName: String) {
    self.name = name
    self.shortName = shortName
  }

  var defaultValueDescription: String {
    "\(self.name.yellow) or \(self.shortName.yellow) for short"
  }

  init?(argument: String) {
    let maybe = Self.allStaticMembers.first { $0.name == argument || $0.shortName == argument }

    guard let found = maybe else {
      return nil
    }

    self = found
  }
}
And here is the Package.swift if you’re interested.
// swift-tools-version: 5.9
import PackageDescription

let package = Package(
  name: "Terraform-SPX-Scripts",
  platforms: [
    .macOS(.v13),
  ],
  dependencies: [
    .package(url: "https://github.com/DanielSincere/Sh.git", from: "1.3.0"),
    .package(url: "https://github.com/DanielSincere/StaticMemberIterable.git", from: "1.0.0"),
    .package(url: "https://github.com/apple/swift-argument-parser", from: "1.2.0"),
  ],
  targets: [
    .executableTarget(
      name: "tf",
      dependencies: [
        "Sh",
        "StaticMemberIterable",
        .product(name: "ArgumentParser", package: "swift-argument-parser"),
      ]),
  ]
)
Thanks!
Thanks for reading! StaticMemberIterable is available for free on GitHub and requires Swift 5.9. If you like the macro, please sponsor me on GitHub.
Learned about op run
Learned about op run today to pass secrets from 1Password to scripts and commands. This is such a game changer for me! Here’s the link to the documentation: https://developer.1password.com/docs/cli/reference/commands/run/
And here’s an example
op run --env-file tf.env -- terraform initwhere tf.env looks like
AWS_ACCESS_KEY_ID="op://MyVault/Terraform/access-key"
AWS_SECRET_KEY="op://MyVault/Terraform/secret-key"
op run replaces those op:// links with the values of the referenced secret and runs terraform init in a sub-process. So slick!
Setting up Universal links for iOS & Android
I use universal links to link into my app, Underway. I’ll talk about iOS first, and then Android.
I use a lot of the same code for Universal Links and User Activities, but will not be covering User Activities in this note. NSUserActivity is used for Continuity and hand-off between macOS and iOS.
iOS
For Apple platforms, I need an apple-app-site-association file, an entitlement in our iOS app, and of course the code to handle the link in your app.
Apple app site association on my website
This is a JSON file without the JSON extension. I serve this file on from my webserver using Nginx at .well-known/apple-app-site-association. This file served over HTTPS is good enough for Apple to trust that I own & control the domain.
I originally used Vapor to serve this as a route. I added that path to my route configuration, and set the Content-Type to application/json. Later I swapped to serving this as a static file from Nginx.
For some examples of how to form this file, we can look at YouTube’s apple-app-site-association. We can see a whole bunch of "NOT /path/*" followed by a "*" at the end. This tells iOS to send the link to the YouTube app for all paths, except for the ones starting with NOT
Entitlement in iOS
iOS also needs an entitlement to associate my domain with my app. Just like other iOS entitlements, I added an entitlement by editing the property list directly. You could also edit this in Xcode.
For my app my Underway.entitlements property list contains the following code:
<key>com.apple.developer.associated-domains</key>
<array>
  <string>applinks:www.underway.nyc</string>
</array>
My app’s main Info.plist doesn’t need anything for Universal links, though I did register a custom URL scheme to force-link to Underway.
I can also make this change in Xcode’s editor by opening the project file, clicking on the Signing & Capabilities tab, clicking on the + Capability, and scrolling down to the “Associated Domains” item. For further steps, please follow Apple’s documentation for adding an associated domain.
Handling the URL in iOS
After the other two steps are done, it’s time to write some code! In my UIApplicationDelegate subclass, there are three methods to override. These may be deprecated, but with all of the edges cases, I choose to simply leave these in my code.
func application(_ app: UIApplication, open url: URL, options: [UIApplication.OpenURLOptionsKey: Any] = [:]) -> Bool {
  return self.open(url: url)
}

func application(_ application: UIApplication, didFinishLaunchingWithOptions launchOptions: [UIApplication.LaunchOptionsKey: Any]?) -> Bool {

  if let url = launchOptions?[UIApplication.LaunchOptionsKey.url] as? URL  {
    return self.open(url: url)
  } else {
    return true
  }
}

func application(_ application: UIApplication, open url: URL, sourceApplication: String?, annotation: Any) -> Bool {
  return self.open(url: url)
}
And my open(url: URL) -> Bool method parses the URL and pushes the requested screen onto the root navigation controller (i.e. the root UINavigationController subclass.
Your app may want to do something different based on the URL, for example, open a modal window.
Parsing URLs
All my URLs are stored in a Swift package shared between my Vapor web server, my iOS app, and other targets, such as my Kubernetes YAML generator for configuring cluster ingress. This is a fantastic case of code-reuse.
I model my routes as one large Swift enumeration. Here’s a taste:
enum AppRoute {
  case station(StationRoute)

  struct StationRoute {
    let stationID: UnderwayStation.ID
    let action: Action

    enum Action: String {
      case arrivals, filter, serviceAlerts = "service-alerts"

      static let `default`: Self = .arrivals
    }
  }
}
Then since add a computed variable on AppRoute, then I can ask for the universal URL like this:
let timesSquare = AppRoute.station(.init(stationID: 25))
print(timesSquare.universalURL) // https://www.underway.nyc/station/25
And I also added a static parsing method to AppRoute to go in the reverse direction, which is how I’ll know which screen to show when opening a Universal Link.
let timesSquare: AppRoute = AppRoute.parse(url: URL(string: "https://www.underway.nyc/station/25"))The big switch
My root navigation controller has a massive switch statement for opening every screen in my app, after parsing the AppRoute
switch appRoute {
  case .station(let stationRoute):
    switch stationRoute.action {
    default:
      self.push(StationArrivalsWireframe(id: stationRoute.stationID))
    }
  }
}
SwiftUI
In SwiftUI I can add onOpenURL to my top-level view. Inside of that call back, I can parse the URL as before, and append the parsed AppRoute to my navigation model.
Android
Since Underway is also available for Android, I also set up Universal links for Android.
assetlinks.json on website!
Android has it’s own version of the apple-app-site-association file. It’s called asset links, and looks like this.
[
  {
    "relation": ["delegate_permission/common.handle_all_urls"],
    "target": {
      "namespace": "android_app",
      "package_name": "nyc.underway.underway",
      "sha256_cert_fingerprints": [
        "00:00:00:00:00:00:00:00:00:00:00:00:00:00:00:00:00:00:00:00:00:00:00:00:00:00:00:00:00:00:00:00"
      ]
    }
  }
]
AndroidManifest.xml in Android Studio
Android apps are already a large navigation stack, with the “Back” button built-in to the operating system, and even the hardware on older models! My navigation model for internal app navigation uses the same mechanism as the
Over in Android Studio, in the AndroidManifest.xml, I registered each screen, and an intent on how to open it. I added the universal link, www.underway.nyc along with an expression to match the path, with a wildcard where the station ID would be.
<activity
    android:name=".screens.StationScreen"
    android:exported="true">
  <intent-filter android:autoVerify="true">
    <action android:name="android.intent.action.VIEW" />

    <category android:name="android.intent.category.DEFAULT" />
    <category android:name="android.intent.category.BROWSABLE" />

    <data
        android:host="www.underway.nyc"
        android:pathPattern="/station/..*/arrivals"
        android:scheme="https" />
  </intent-filter>
</activity>
Handling the URL in Android Studio
Now that the configuration is up, in my Activity subclass, I get the URL from the Activity’s intent. Then I parse the URL to get the station ID and proceed to load the screen from there.
override fun onCreate(savedInstanceState: Bundle?) {
  super.onCreate(savedInstanceState)
  val route = AppRoute.parse(intent.data)
A big sealed class
Although Kotlin does have enum’s, I use a sealed class to model the AppRoute for the Android app.
sealed class AppRoute() {
  data class Station(val stationID: UnderwayStationID, val action: StationAction) :
    AppRoute()
  }
and
sealed class StationAction(val rawValue: String) {
  object AllArrivals : StationAction("arrivals")
  object ServiceStatus : StationAction("service-status")
}
A tiny when
Because Android handles the routing, I don’t need a massive when statement like in iOS. I do use a when statement to cast the route to the appropriate case like this:
when (route) {
  is AppRoute.Station -> {
    val stationID = route.stationID
    // ...
  }
  else -> return null
}
I don’t expect the else case to ever be executed, but it’s there in case Android’s routing or my parsing ever fails unexpectedly.
I think of Kotlin’s when and Swift’s switch as equivalents.
And there you have it
Universal links all set up for iOS and Android! Done!
Thank you to haIIux for contributing to this article.
Like a business suit for your voice
When we consultants want to make a good impression in the before-times, we would wear a business suit. Since remote work is here to stay, we want to make a good impression remotely also. Remote meetings give you two senses to work with: sight and sound. I wrote about visuals in my previous post, and today, I would like to write about audio.
What YouTube, Twitch, and TikTok have taught us is that low-quality sound quality has a bigger impact on your audience than low-quality visuals. PowerPoint’s longevity further proves this point. So let’s talk about some practical things you can do to improve your sound: sound treatment, a mic, and an audio interface.
Clap!
The most important part of sound is a good room. Fortunately this is one the most cost-effective improvement you can make.
What you wanna do is clap where you have your meetings and listen for an echo. Removing this echo will significantly improve your sound. You don’t need to spend a lot of money here. A few blankets and a few sound-proofing squares can drastically improve your room’s echoiness.
A good mic
The standard that you see many podcasters use is the Shure SM7B. And while this is a great mic, it does cost ~$400 USD. I use the SM58, which is a quarter of the price and indestructible. You might see this mic used for standup comedy and rock & roll singing.
A good audio interface
To get the sound from your mic into your computer, you need an audio interface. And once you have one, be sure to go back and listen to all your favorite records. You’ll definitely hear the difference in sound quality compared to a MacBook Pro.
In meetings at work, it’s so much more pleasant to listen to my colleague’s that use a good audio interface, over the mic in our MacBooks. Do I perceive them more confident because their voice is clear, or are they simply more confident?
I started with the Apollo Solo. This audio interface offers inputs for two mics, and an output for speakers and an output for headphones. The Apollo Solo has USB-C and Thunderbolt 3 versions. In my experience, USB hasn’t been reliable for me, so I went with Thunderbolt.
Setting up the Apollo Solo for Zoom
By default, Zoom uses all of the input channels from the Apollo Solo, which is not what you want, at all. And while Zoom does offer a preference for this, I’ve found that preference to be buggy.
Fortunately, the Apollo Solo has settings also. In the Settings screen in the Apollo Console app, there’s an “I/O Matrix” tab where you can modify how your MacBook perceives the Apollo Solo. I collapse all my mic inputs down to one stereo pair: the AUX1 bus. Everything I want Zoom to hear, I send to the AUX1 bus. I disable every other input so that no sounds get sent to Zoom accidentally.
Likewise, with my computer’s sound outputs, I configure the Apollo Solo’s I/O Matrix so that just one stereo pair is visible to my MacBook. Here, I use the Virtual channels. This allows me to configure a compressor on the sound from my computer, before routing the audio to my headphones or my speakers.
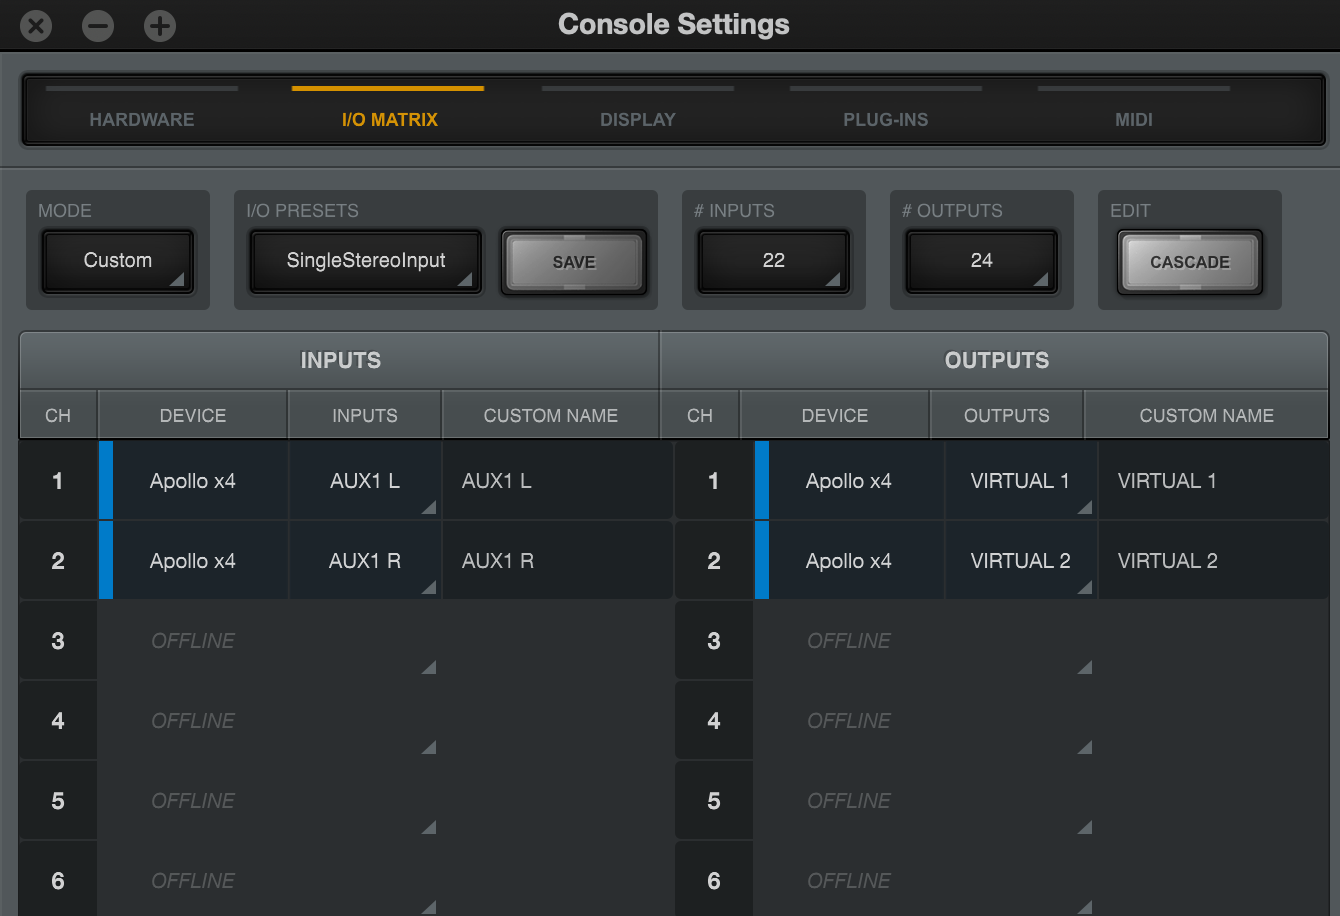
I/O Matrix tab in the Apollo Console app
Once you’ve configured the I/O matrix, open “Audio MIDI Setup” on your Mac, select “Universal Audio Thunderbolt”, and then click on the “Output” tab, and then “Configure Speakers”. You wanna makes sure the Left and Right channels are sent to Virtual 1 & Virtual 2.
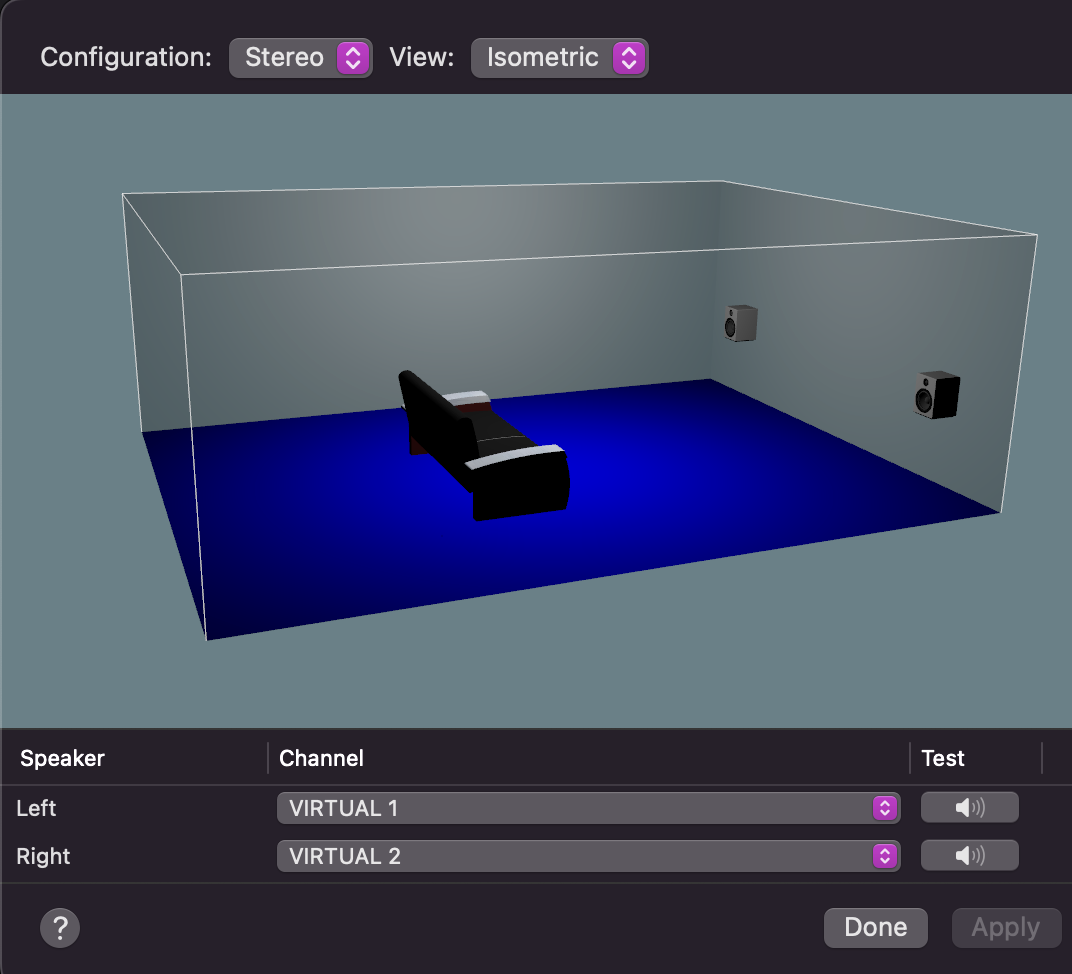
”Configure Outputs” window in the Audio MIDI Setup app on macOS
While you’re in “Audio MIDI Setup”, confirm that your Mac is using it for input and output.
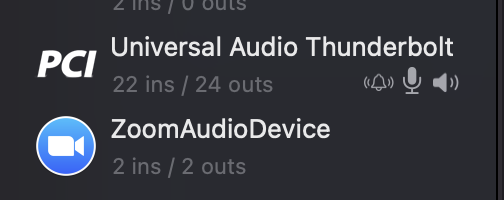
Audio MIDI Setup configured to use the Apollo Solo
Now you’re all set up to sound great on Zoom!
Other considerations
Here are a few other things to think about for your audio setup
Plugins
The Apollo can run plugins, on it’s own processor! I recommend the C-Suite C-VOX to help reduce noise. This plugin is a necessity for living in New York City. You may also consider a de-esser and a compressor. Remember, the worst thing that digital audio can do is clip into the red, and the second worst thing digital audio can do is clip into the yellow. Use your compressor and pre-amp settings to keep your voice around -12dB, to leave plenty of room for loudness spikes.
Vendors
Sweetwater’s customer service has been good to me and to many other folks. I highly recommend them. I try to buy from smaller retailers whenever possible. For your convenience, here is a link to the Apollo Solo on Sweetwater.com. Also check for refurbished or demo models!
Mic stand
You’ll need something to hold that microphone for you. Many podcaster’s like the Z-style spring mounts for the flexibility when moving around. I currently use a static mic stand, which helps to remind me to sit up straight.
That’s all for now
I hope your clients and colleagues appreciate the extra effort your putting into what they see and hear remotely.
SPX is the new name of Swish
The open-source scripting tool for Swift will have a new name! The name of related tool “Sh” will not change. Here’s what you need to know.
- Motivation
- Timeline
- Changes
- Current state of Swish and Sh
- Request for sponsors
Motivation
Here are the three reasons that motivate this change.
Self-evident “NPX for Swift” is how I had been introducing Swish, so why not just use the name “spx” to clarify that association? “SPM” is named closely to “NPM”. Further, the “shell” portion of “SWIft SHell” is not as relevant any more. Swish is powering all kinds of scripting now, not just shell scripting.
Visually distinct When glancing over a tutorial, “swift” and “swish” are too easy to mix up. Also, I’ve personally mixed them up while typing commands on the command-line. “SPX” and “Swift” offer visual distinction.
More broadly appealing There already is a Homebrew package named “swish”. Swish is a fun name, a cute name even, but we need it to change to attract more folks.
Timeline
The first step is to publish this so that folks know what to expect. The changes to the core repos have completed. GitHub maintains redirects to renamed repos for a certain amount of time.
Changes
Here are all the changes planned.
Command line changes
Instead of typing swish, the command-line tool is now spx
GitHub repos
- DanielSincere/Swish moved to DanielSincere/SPX
- DanielSincere/homebrew-swish moved to DanielSincere/homebrew-spx
Homebrew commands
brew tap fullqueuedeveloper/swish
brew install swish
is now
brew tap danielsincere/danielsincere
brew install spx
If Swish was already installed, untap that first.
brew untap fullqueuedeveloper/swishFile structure
Instead of the ./Swish directory being the default place that Swish looks for scripts, SPX will now look in the ./SPX directory.
Current state
Since first publishing Swish and Sh, the ecosystem has grown quite a bit.
Passwords and other secrets are easily fetched from 1Password using Sh1Password which leverages the op command-line tool. Local Postgres databases are easily created and destroyed using ShLocalPostgres. I’ve used Swish & Sh to create the animated GIFs for my Twitch and Discord (by leveraging ffmpeg and inkscape command-line tools). And of course, standard iOS build actions like pushing builds to the App Store, capturing screenshots, and creating app icons as exemplified in OpenBytes’s iOS app template repo.
Request for sponsors
If SPX (f.k.a. Swish) & Sh have helped you out, please consider sponsoring me on GitHub. Thank you to my current GitHub sponsors, 0xLeif!
How to think about Responsive Design for iOS
Some apps look good on both iPad and iPhone. This is called “Responsive Design”. And back when there were only 2 or 3 phone sizes, designers could just design 2 or 3 screens for each screen.
Now, with Dynamic Type, and so many different screen sizes, Responsive Design becomes more important, just like on web.
How to do Responsive Design?
It really depends. It depends on what your app needs, and what your designer wants.
One approach is never use custom components. This will let iOS layout everything for you. It might not look like how you had in mind, but it will be readable. This is how I like to start new apps, but it seems I never stay with this approach.
A second approach is to use breakpoints. Choose a predefined layout based on the screen height or based on the accessibility text size. This approach is often used on the web. See TailwindCSS for example, their approach encourages you to design for the tiniest screen size you support first, and then add in more elements as the screen size increases.
A third approach is to sit with a designer and talk through all the different layouts across all the different possibilities: translated text, accessibility text size, screen size from iPhone SE to iPhone Pro max to iPad.
What have I done?
In Haptics Studio, I use my preferred layout up to a certain point. But at a certain accessibility text size, I revert to option one: using Apple defaults. Find out more about Haptics Studio
In Underway, we don’t use dynamic text at all, it’s on our roadmap. And on the tiniest iPhone SE, the map screen’s popup was difficult to use. We’ve ensured that the design works well enough for up to 3 digits of minutes for a train arrival. And in the most confined space, the popover on the map, we’ll never go over three digits, since we convert it to the string >1 hr. Find out more about Underway
I’ve also been on teams where they have a pre-built design system, and product designers and developers simply use pre-built components to specify screens. These pre-built components were created to self-adjust depending on how long the text is, and accessibility text sizes.
One final tip
There’s always eliding the text with ellipses, and adding a button to read the rest. Knowing when and where to do this is an art, not a science.